While modern technology has gifted us with dehydrators for making this savoury treat, not everyone has this specialised equipment. So how do you dry jerky without a dehydrator?
You can make jerky without a dehydrator by using your kitchen oven or an air fryer set at a low temperature. In the oven, slice the marinated meat thinly and arrange it on racks, propping the oven door open slightly for proper airflow. Alternatively, in the air fryer, place the marinated slices in a single layer, preheating the air fryer to a low temperature. Both methods allow for effective dehydration, resulting in flavorful homemade jerky.
In this comprehensive guide, we’ll explore how to make delicious jerky without a dehydrator, using common kitchen appliances like the oven and air fryer. So, roll up your sleeves, grab your favourite meat cut, and embark on a jerky-making adventure!
How To Make Jerky Without A Dehydrator:
Not everyone has a dehydrator in their kitchen arsenal, but most households have an oven or an air fryer. Making jerky without a dehydrator allows for utilising common appliances, making this delicious snack achievable for a wider audience.
Dehydrators, while fantastic for making jerky, can be an additional expense. Making jerky without a dehydrator allows individuals to enjoy the process without the need for a specific appliance, making it a more cost-effective option for those on a budget.
Let’s delve into how to make jerky without a dehydrator but before the method let’s gather our ingredients:
Ingredients:
- Meat: Choose lean cuts of meat; if you are choosing beef, look for top round or bottom round as they are lean and cost-effective. (If want to know more about the type of meats you can use for jerky, have a read of this post).
- Marinade: Create a flavourful concoction using soy sauce, Worcestershire sauce, liquid smoke, garlic powder, onion powder, black pepper, and any other preferred seasonings. (Here is a post on how to make flavourful jerky).
- Optional: Add a touch of sweetness with honey or brown sugar for a well-balanced flavour profile.
Preparation:
- Slice the Meat: Aim for consistent, thin slices (about 0.5cm or 1/4 inch thick) to ensure even drying. A good tip is to freeze your meat for an hour before slicing it into thin strips, this will make it a lot easier!
- Marinate the Meat: Submerge the sliced meat in your flavorful marinade. Allow it to marinate for at least 4 hours, or preferably overnight, in the refrigerator. (This post will answer your questions about marinating jerky)
- Pat Dry: Before drying, pat the marinated meat slices with paper towels to remove excess moisture. (you don’t want drips from your meat burning in your oven or dehydrator.

Methods:
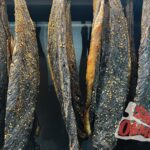
1. Oven Method:
- Preheat the Oven: Set your oven to the lowest possible temperature, typically around 170°F (77°C).
- Arrange on Racks: Place the marinated meat directly on oven racks or use a baking sheet lined with parchment paper.
- Prop the Oven Door Open: To allow moisture to escape, prop the oven door open slightly using a wooden spoon or oven-safe object.
- Monitor and Flip: Check the jerky every 30 minutes, flipping the slices halfway through to ensure uniform drying.
- Testing for Doneness: Jerky is ready when it bends without breaking. It should have a slight moisture content without being overly chewy. (You’ll find helpful tips for how to tell when jerky is done in this post).
(For a thorough breakdown of how to make jerky in the oven, have a read of this insightful post).
2. Air Fryer Method:
- Preheat the Air Fryer: Preheat your air fryer to 160-180°F (71-82°C).
- Lay the Slices: Place the marinated meat slices in a single layer in the air fryer basket, ensuring proper air circulation.
- Air Fry: Cook for 2-3 hours, flipping the slices halfway through for even drying.
- Check for Doneness: Perform the bend test to determine if the jerky is ready.
Tips And Tricks For Making Jerky In The Oven:
Optimal Slicing:
Ensure uniformity in your meat slices. Aim for a thickness between 1/8 to 1/4 inch. This consistency promotes even drying and results in a uniform texture across your batch.
Proper Marination:
Marinate your meat for an extended period, preferably overnight. This allows the flavours to penetrate the meat thoroughly, giving your jerky a rich and well-balanced taste.
Drying Temperature:
Preheat your oven to the lowest possible temperature, usually around 170°F (77°C). This slow and low cooking method helps to dehydrate the meat without cooking it.
Air Circulation:
Place the meat directly on oven racks or use a baking sheet with a wire rack. This ensures proper air circulation around the meat slices, aiding in even drying.
Door Propping Technique:
Prop the oven door open slightly using a wooden spoon or an oven-safe object. This helps moisture escape, preventing the jerky from becoming too chewy.
Rotate and Flip:
Periodically rotate and flip the meat slices during the drying process. This step ensures that each piece dries uniformly, preventing some pieces from becoming overly dry while others are underdone.
Perform the Bend Test:
Jerky is ready when it bends without breaking. Aim for a slightly pliable texture with a hint of moisture. Over-drying can lead to a tough and overly chewy result.

Tips and Tricks for Making Jerky in an Air Fryer:
Choose the Right Cut of Meat:
Opt for lean cuts like beef roasts (Topside or Bottom round), chicken breast, or turkey. Trim off excess fat, as it can hinder the drying process.
Uniform Slicing:
Consistency is key. Slice the meat into thin, uniform pieces, around 1/8 to 1/4 inch thick. This ensures even dehydration and a consistent texture.
Preheat the Air Fryer:
Preheat your air fryer to a low temperature, around 160-180°F (71-82°C). Preheating ensures that the jerky starts dehydrating immediately when placed in the air fryer.
Single Layer Placement:
Arrange the marinated meat slices in a single layer in the air fryer basket. Overcrowding can impede proper air circulation, leading to uneven drying.
Flip Halfway Through:
Flip the meat slices halfway through the cooking time. This ensures that both sides dry evenly, resulting in a consistent jerky texture.
Avoid Overcooking:
Be cautious not to overcook the jerky. It’s better to have slightly chewy jerky than pieces that are too dry and tough. Adjust the cooking time accordingly.
Consider Parchment Paper:
If your air fryer tends to have sticking issues, consider using parchment paper to line the basket. This can make it easier to remove the jerky slices without any sticking.
Clean the Air Fryer Thoroughly:
After making jerky, clean the air fryer basket and tray thoroughly to remove any residue. This ensures that your air fryer continues to function efficiently.
Adjust Cooking Time for Thickness:
If you vary the thickness of your meat slices, be prepared to adjust the cooking time accordingly. Thicker slices may require more time for proper dehydration.

Is It Better To Make Jerky In A Dehydrator Or The Oven?
The choice between a dehydrator and an oven ultimately depends on personal preference, available equipment, and desired outcomes. A dehydrator is the most common way to dry jerky but using an oven can provide the same excellent outcomes. Let’s look at the advantages of both appliances and consider:
Advantages:
- Precision Temperature Control: Dehydrators typically offer precise temperature control, allowing you to set and maintain the ideal temperature for drying. This precision is particularly beneficial for achieving consistent results.
- Energy Efficiency: Dehydrators are designed specifically for the dehydration process, making them energy-efficient for this purpose. They use less energy compared to ovens, especially when drying over an extended period.
- Dedicated Appliance: Owning a dehydrator means you have a dedicated appliance for the task. This can be advantageous if you frequently make jerky or other dehydrated snacks, as it frees up your oven for other cooking needs.
- Even Drying: The design of dehydrators, with trays that allow for proper air circulation, promotes even drying across all slices. This results in uniformly textured jerky.
- Hands-Off Approach: Once set up, a dehydrator requires minimal monitoring. This hands-off approach allows you to go about your day while the jerky dehydrates.
Making Jerky in the Oven:
Advantages:
- Widespread Availability: Almost every kitchen is equipped with an oven, making it a readily available option for most home cooks. If you’re just starting with jerky making, using the oven allows you to try the process without investing in additional equipment.
- Larger Capacity: Ovens generally have a larger capacity than most dehydrators, allowing you to make larger batches of jerky in one go. This can be beneficial for those who want to stock up on homemade snacks.
- Versatility: Ovens are versatile appliances that can be used for various cooking tasks. If kitchen space is a consideration, using the oven for jerky means you don’t need to dedicate space to a separate appliance.
Considerations:
- Time and Patience: Both methods require time, but the oven may take longer due to its higher minimum temperature. Dehydrators are often faster for the dehydration process.
- Initial Cost: Dehydrators are an additional kitchen appliance and come with an upfront cost. If you’re on a budget, using the oven may be a more cost-effective starting point.
- Space Considerations: If kitchen counter or storage space is limited, the size and dedicated nature of a dehydrator may be a factor to consider.
Conclusion:
Crafting jerky without a dehydrator is not only possible but also a rewarding culinary venture. Whether you opt for the oven or air fryer, the key lies in patience, precision, and a dash of creativity. So, fire up your chosen appliance, savour the aroma of marinated meat wafting through your kitchen, and get ready to snack on a treat you made with your own two hands!
Recent Posts:
- The Truth About Beef Jerky And Your Health
 A favourite among outdoor enthusiasts for its transportability, for fitness enthusiasts for …
 - Kangaroo Biltong: How To Make ItWe all know beef, game, and ostrich are the most traditional meats …
- What Is Biltong? Everything You Need To KnowIn the world of savoury snacks, one delicacy stands out for its …