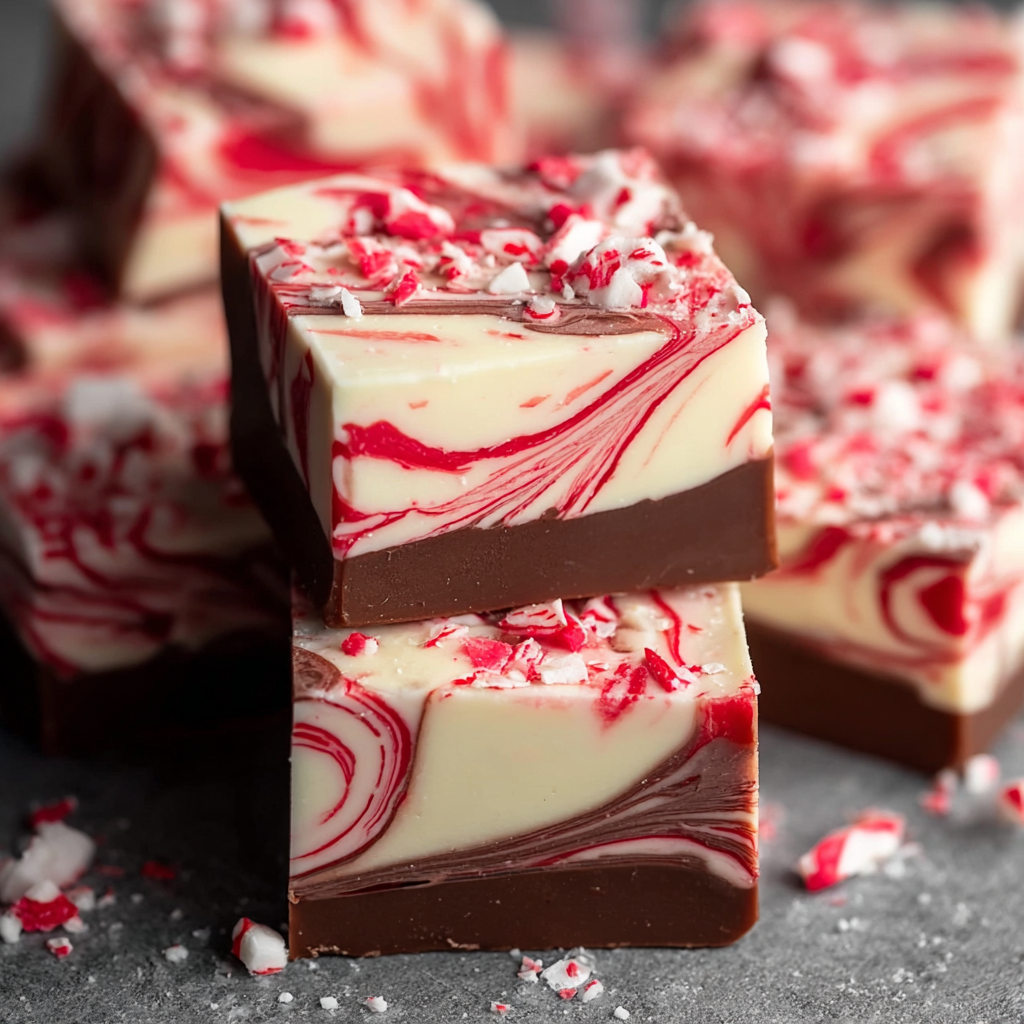
Some desserts are simply delicious. Others are undeniably festive. This Peppermint Swirl Fudge is both. With dramatic candy-cane swirls of red and white layered into rich chocolate, it looks like a bakery showpiece—but it’s made with simple ingredients and a reliable method that actually works.
This recipe is designed to avoid the most common fudge problems: seized chocolate, grainy texture, or overly thick paste. The result is silky-smooth fudge that sets cleanly, slices beautifully, and tastes just as good as it looks.
Perfect for holiday gifting, cookie trays, or Christmas dessert spreads, this is one of those recipes you’ll come back to year after year.
Why This Fudge Works Every Time
After years of fighting seized chocolate, I finally switched completely to the double boiler method, and it changed everything. Chocolate and sweetened condensed milk melt far more gently over steam than in the microwave, giving you a smoother, more forgiving base.
The chocolate layer uses:
- Semi-sweet or dark chocolate for structure and balance
- Butter for richness
- A full can of room-temperature sweetened condensed milk for a creamy, stable texture
The peppermint swirl layer is intentionally lighter. Using less condensed milk keeps it thick enough to hold its shape, so the swirl stays defined instead of bleeding into the base.
The Importance of Real White Chocolate
Not all white chocolate is created equal. For best results, use real white chocolate that contains cocoa butter. Almond bark or compound coatings don’t melt or swirl the same way and can turn chalky.
Melt the white chocolate slowly, then gently swirl in red gel food coloring—just enough to create ribbon-like streaks. Stop stirring as soon as the color separates clearly. Overmixing will turn the swirl pink instead of marbled.
Ingredient Tips That Make a Difference
- Sweetened condensed milk must be at room temperature to prevent seizing
- Peppermint extract is strong—½ teaspoon per layer is plenty
- Candy canes crush more finely than hard peppermints and stick better on top
- Dark or semi-sweet chocolate gives better contrast than milk chocolate
Every ingredient is chosen for texture, structure, and clean flavor.
Swirling Like a Pro
Pour most of the chocolate layer into the pan first. Spoon dollops of the peppermint mixture across the surface rather than pouring it all at once. Use a knife or skewer to make wide figure-eight motions—gentle and deliberate.
Too much swirling blends the layers. Too little leaves them disconnected. When done right, the swirls stay crisp and dramatic after chilling.
Finish with crushed peppermint candies, pressing them lightly into the warm surface so they adhere.
When Is the Fudge Ready?
The fudge is set when the surface looks matte, not glossy. Once chilled, it should lift cleanly from the pan and cut into neat squares without sticking.
For clean cuts, use a hot knife, wiping it between slices. If the fudge feels too firm straight from the fridge, let it sit at room temperature for a few minutes before slicing.
Easy Variations
- Swap peppermint for almond or orange extract
- Add chopped pistachios or toasted nuts to the chocolate layer
- Use green gel coloring—or red and green swirled separately—for extra holiday flair
- Mix dark and semi-sweet chocolate layers for deeper flavor contrast
Storage Tips
Store in an airtight container in the refrigerator for up to one week, or freeze for longer storage. This fudge stays softest when served the same day it’s cut but holds up beautifully for gifting.
Peppermint Swirl Fudge
Creamy, festive, and irresistibly smooth, this Peppermint Swirl Fudge is a holiday classic made foolproof. With bold peppermint flavor, dramatic swirls, and a melt-in-your-mouth texture, it’s perfect for Christmas trays, cookie swaps, or homemade gifts.