If you’re looking for the ultimate spooky treat that’s easy, fun, and a little gross (in the best way), these Marshmallow Rice Krispies Halloween Brains are it! They’re soft, chewy, eerily realistic, and absolutely delicious — the perfect mix of creepy and cute for Halloween parties, trick-or-treaters, or school events.
The Spooky Story Behind the Brains
Hi, I’m Linda — welcome to Tasty at Home, where bold flavors meet everyday kitchens.
A few years ago, I tried to make fancy fondant zombie cakes for my daughter’s Halloween party. Six frustrating hours later, I ended up with green blobs that looked more like a science experiment gone wrong than festive desserts.
Then I spotted that bright red box of Rice Krispies in the pantry — and inspiration struck! Thirty minutes later, the “brains” were born. They were creepy, colorful, and a huge hit. The kids screamed (in delight), and parents were asking for the recipe before the night was over.
Sometimes, the simplest ideas make the best memories.
Why You’ll Love These Halloween Brains
These gooey, marshmallowy “brains” are:
- 🧠 Spooky and fun – Perfect for Halloween parties or themed movie nights.
- 🍬 Easy to make – No baking, no fuss, ready in 30 minutes.
- 🌾 Naturally gluten-free – Just use certified gluten-free Rice Krispies.
- 🎃 Totally customizable – Add chocolate, peanut butter, or colorful variations!
They’re a creative twist on classic Rice Krispies treats — nostalgic, but with a frightful flair.
Ingredients
| Ingredient | Amount | Purpose |
|---|---|---|
| Unsalted butter | 6 tbsp (85g) | Creates smooth base |
| Regular marshmallows | 6 cups (150g) | Binding agent |
| Rice Krispies cereal | 4 cups (100g) | Crunchy foundation |
| Salt | ½ tsp | Balances sweetness |
| Red food coloring | As needed | For the brain effect |
💡 Tip: Use gel-based coloring for brighter results without adding too much moisture.
How to Make Marshmallow Rice Krispies Brains
Step 1: Melt the Base
In a large heatproof bowl set over a pot of simmering water (bain-marie style), melt butter and marshmallows together. Stir until smooth and glossy — about 2–4 minutes.
Step 2: Add Color and Salt
Remove from heat and mix in salt and a few drops of red food coloring. Start light — you can always deepen the color later.
Step 3: Stir in the Cereal
Pour the mixture over the Rice Krispies and stir until evenly coated. The mix should be sticky but manageable.
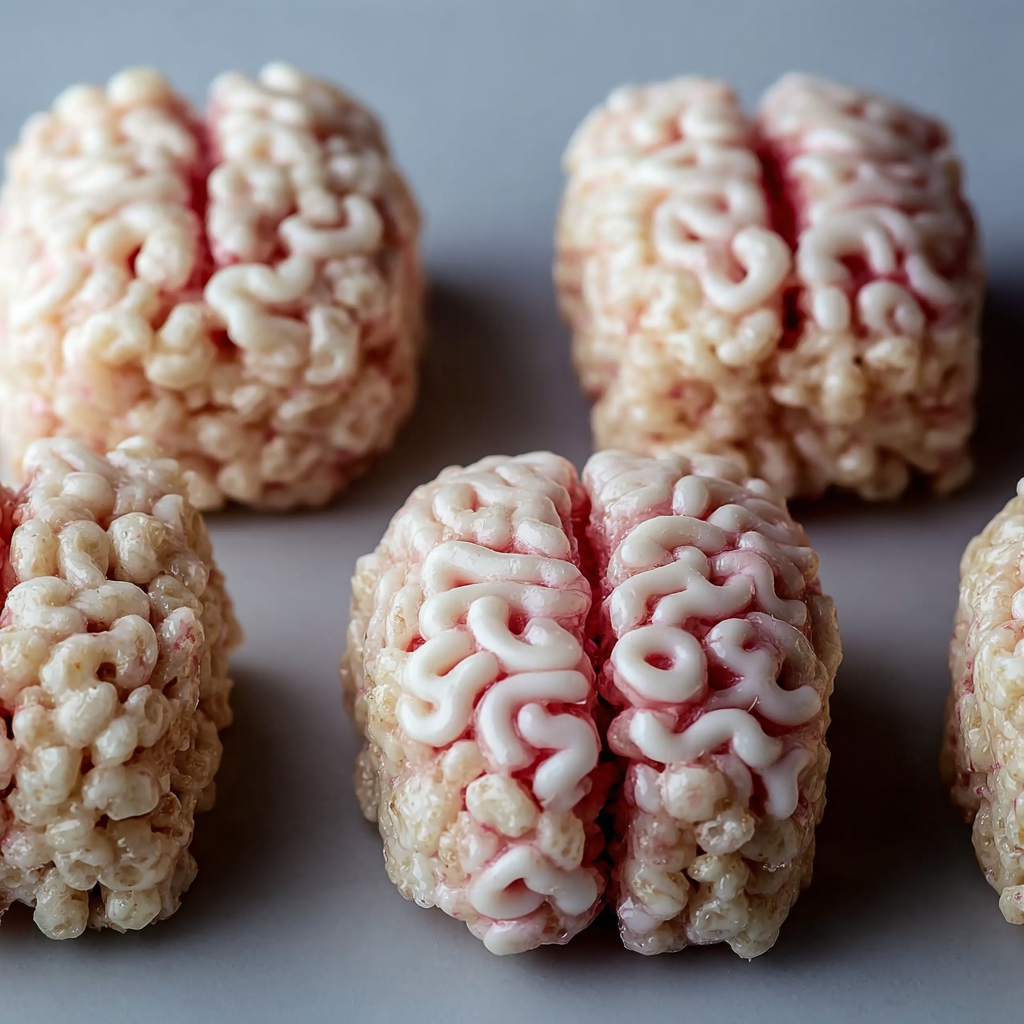
Step 4: Shape the Brains
Lightly oil your hands, grab small handfuls (about tennis-ball size), and shape into ovals.
Use a butter knife to press a line down the center — that signature “brain groove”!
Then, dip a toothpick in food coloring and draw small squiggly “veins” across the surface for an extra spooky look.
Fun Variations
- 🍫 Chocolate Chip Neurons: Stir in mini chocolate chips before shaping.
- 🥜 Peanut Butter Brains: Replace 2 tbsp of butter with peanut butter.
- 🍊 Pumpkin Brains: Use orange food coloring for a harvest twist.
- 🌰 Spiced Brains: Add a pinch of cinnamon or nutmeg for fall flavor.
Storage
| Method | Duration | Notes |
|---|---|---|
| Room Temp | 5–7 days | Store in airtight container |
| Refrigerated | Up to 2 weeks | May firm slightly |
| Frozen | 2–3 months | Thaw at room temp before serving |
Serving Suggestions
Serve these brains alongside:
- Bloody red velvet popcorn
- Pumpkin cupcakes
- Hot apple cider or cocoa
They also make a hilarious addition to a “mad scientist” dessert table!
Final Thoughts
These Marshmallow Rice Krispies Halloween Brains prove that spooky treats don’t need to be complicated. With just a few ingredients and a little creativity, you can whip up something both terrifying and tasty.
They’re the kind of dessert that makes Halloween unforgettable — a mix of laughter, fun, and maybe a little bit of fright.
So grab that red food coloring, call the kids into the kitchen, and get ready to make some deliciously gross memories.