These lentil crackers are ultra crunchy, nutritious, and incredibly easy to make! Packed with plant-based protein and fiber, they’re a wholesome snack made almost entirely from lentils—no grains, no gluten, and completely vegan. Perfect for dipping, snacking, or adding to a healthy platter!
🌱 Why You’ll Love These Lentil Crackers
- High in protein & fiber
- Grain-free, gluten-free & vegan
- Super crunchy & satisfying
- Simple blend-and-bake recipe
- Easily customizable flavors
Made with just a few pantry staples, these crackers are a much healthier alternative to store-bought chips—no preservatives, just clean, nourishing ingredients.
🛒 Ingredients (Serves 4)
- 1 cup (200 g) dried red lentils
- ½ cup (120 ml) water
- 1 garlic clove
- 1 tsp salt
- Onion powder, paprika, turmeric (to taste)
- 1–2 tbsp oil
👩🍳 Instructions
1. Soak the Lentils
Rinse lentils thoroughly, then soak in plenty of water for at least 2 hours. Drain, rinse again, and pat dry.
2. Blend
Blend lentils with water, garlic, and seasonings until completely smooth.
3. Spread the Batter
Preheat oven to 375°F (190°C).
Pour mixture onto a lined baking tray and spread evenly (about 2–3 mm thick).
4. First Bake
Bake for 20 minutes, then remove from oven.
5. Cut & Season
Cut into desired shapes (squares, triangles, etc.).
Drizzle with oil and spread out evenly.
6. Final Bake
Bake for another 10 minutes until golden and crispy.
7. Cool & Enjoy
Let cool completely—this is when they become extra crunchy!
💡 Tips for Perfect Crackers
- Spread batter thinly (2–3 mm) for best crunch
- Blend until completely smooth to avoid grainy texture
- Remove edges early if they cook faster
- Let cool fully to crisp up properly
🌿 Flavor Variations
- Herbs: rosemary, thyme, oregano, basil
- Spices: cumin, chili flakes, curry powder
- Cheesy flavor: nutritional yeast
- Seeds: sesame, flax, chia, sunflower
- Sweet version: cinnamon + a touch of sugar
🍽️ Serving Ideas
- With dips like hummus, guacamole, or salsa
- On charcuterie boards with olives, nuts, and spreads
- Alongside soups and salads
- With nut butter and fruit for a sweet snack
🧊 Storage
- Room temperature: 5–7 days (airtight container)
- Freezer: up to 3 months
👉 Re-crisp in oven if needed
❓ FAQs
Why are my crackers soft?
They may be too thick or underbaked—reheat briefly to crisp up.
Can I make them oil-free?
Yes, but they may be less crispy and need longer baking time.
Can I use a food processor?
Yes, but a blender gives a smoother batter.
📌 Pinterest Description
Crunchy lentil crackers 🌿✨ High-protein, gluten-free, and super easy to make! A healthy, crispy snack perfect for dipping or snacking anytime.
#HealthySnacks #LentilCrackers #GlutenFree #HighProtein #VeganRecipes #CleanEating #HomemadeSnacks #FoodInspo #EasyRecipes #PlantBased
Oreo Cookie Dough is so ridiculously good!! You just need a few simple ingredients to make this simple edible cookie dough that is safe to eat raw. Skip the baking and enjoy this cookies and cream cookie dough with a spoon! Oreo cookie dough never tasted so good! This edible cookie dough recipe is safe to eat raw and tastes amazing. Skip the baking, grab a spoon and dig in! Making edible cookie dough is even easier than making cookies. Who doesn’t love a good refrigerated cookie dough? I love no-bake desserts like peanut butter dip, no bake pies and ice cream jello because they are so quick and easy to make any time of year. And if you love cookies and cream desserts, you’ll love this Oreo cookie dough recipe! It is a perfect sweet treat loaded with Oreo pieces. Who needs an excuse to eat raw cookie dough? Calling all chocolate lovers!! Grab a spoon and dig into this edible cookie dough loaded with Oreo cookies! Safe to eat raw, this no-bake dessert is sure to satisfy your chocolate cravings. Oreo Cookie Dough Ingredients Only a few basic ingredients along with Oreo cookies are needed for this easy edible cookie dough recipe: all purpose flour: heat treated so it is safe to heat raw (instructions are included below) unsalted butter: room temperature, softened but not melted granulated sugar: just your standard white sugar milk: I used 2% but any variety is fine for this recipe. vanilla extract: because all cookies taste better with some vanilla! I used a pure Mexican vanilla. salt: just a pinch 8 Oreo cookies: I used the classic Oreo Cookies but other varieties like Double Stuff would work as well. This recipe has not been tested with any alternative flours like this gluten free edible cookie dough. If you try something other than all purpose flour, please share your results! For a healthier alternative, try this protein cookie dough which contains vanilla protein powder, giving you 20 grams of protein per serving. Ingredients to make edible cookie dough How to Heat Treat Flour Eating raw flour is a risk since it can contain germs that could cause food poisoning. To make this edible cookie dough safe to eat, you’ll want to heat treat your flour. Best way to do this is to preheat your oven to 350 degrees Fahrenheit. Place your flour on a rimmed baking sheet, gently shaking it to create an even layer. Bake for five to 10 minutes, or until 160 degrees Fahrenheit. Cool your heat-treated flour completely to room temperature before using. Flour on a baking sheet to heat treat flour How to Make Edible Cookie Dough To make your Oreo cookie cookie dough, start by crumbling your Oreo cookies in a quart size resealable bag. I just used my hands because I wanted larger crumbles, but you can use a rolling pin to break them down. You don’t want just Oreo crumbs for this recipe. Crushing oreos in a baggie Using a mixer, beat butter and sugar on medium until fluffy in a large bowl. Add milk, vanilla and salt. Blend until well combined. Mix in your already baked and cooled flour on low speed. You just want to make sure your sugar and butter mixture is fully blended into your dry ingredients. Edible cookie dough mixture Add in your crumbled Oreo cookies. Oreos in cookie dough Gently fold them into your raw dough so you don’t break your Oreo cookie pieces down too much. Oreo mixed into cookie dough Viola! Best part is you can serve this cookies and cream cookie dough immediately or transfer to the refrigerator. You can eat this at room temperature or chilled, whichever is preferred. It will get hard when it is chilled. It is not a cookie dough dip designed for dunking. Let it sit at room temperature for about 15 minutes or even warming it up for around 10 seconds in the microwave will help you eat it with a spoon. Oreo cookie dough never tasted so good! This edible cookie dough is safe to eat raw and tastes so good!! Grab a spoon and dig in! Recommended Recommended Content Easy Strawberry Greek Yogurt Jello Recipe Recommended Content Sweet Cornbread Recipe Recommended Content Black Bean Corn Salsa Oreo cookie dough never tasted so good! This edible cookie dough recipe is safe to eat raw and tastes amazing. Skip the baking, grab a spoon and dig in! 5 from 1 vote Print Oreo Cookie Dough This edible oreo cookie dough is safe to eat raw! If you love eating cookie dough, grab a spoon and dig into this super easy no-bake dessert! Course Dessert Keyword cookie dough, edible cookie dough, edible oreo cookie dough, no bake dessert, oreo, oreo cookie dough, oreo desserts Prep Time 15 minutes Total Time 15 minutes Servings 8 Calories 216 kcal Ingredients 1 cup all-purpose flour 1/3 cup butter room temperature/softened 1/3 cup granulated sugar 2 tablespoons milk 1 teaspoons pure vanilla extract 1/4 teaspoon salt 8 regular Oreos Instructions Preheat the oven to 350° F. Spread flour evenly on a rimmed baking sheet. Bake for 5 to 10 minutes, until the flour reaches 160° F. Cool completely and set aside. Add Oreo cookies into a quart size bag. Seal and crush until crumbled into smaller chunks. Using a mixer, beat butter and sugar on medium until fluffy. Add milk, vanilla and salt. Blend until well combined. Add in flour and stir on low until fully mixed. Fold in crumbled Oreo cookies. Recipe Video Oreo Cookie Dough Video Player is loading.Play Video Recipe Notes Can serve at room temperature or chilled, whichever is preferred. Store leftovers in the fridge in an airtight container for up to one week. Nutrition Facts Oreo Cookie Dough Amount per Serving Calories 216 % Daily Value* Fat 10 g 15 % Saturated Fat 6 g 38 % Trans Fat 0.3 g Polyunsaturated Fat 1 g Monounsaturated Fat 3 g Cholesterol 21 mg 7 % Sodium 182 mg 8 % Potassium 54 mg 2 % Carbohydrates 29 g 10 % Fiber 1 g 4 % Sugar 13 g 14 % Protein 2 g 4 % Vitamin A 243 IU 5 % Calcium 12 mg 1 % Iron 2 mg 11 % * Percent Daily Values are based on a 2000 calorie diet. This edible oreo cookie dough is safe to eat raw! If you love eating cookie dough, grab a spoon and dig into this super easy no-bake dessert More Oreo Dessert Recipes If you just can’t get enough of Oreo desserts (and really, who can blame you), here are some other delicious recipes featuring plenty of your favorite sandwich cookie! REWRITE ARTICLE
Oreo Cookie Dough (Edible, No-Bake & Irresistible!)
If you love sneaking bites of cookie dough, this Oreo Cookie Dough is about to become your new obsession! 🍪✨ Made with just a handful of simple ingredients, this safe-to-eat edible cookie dough is packed with chunks of Oreo cookies and rich cookies-and-cream flavor—no baking required!
Grab a spoon and dig into this creamy, sweet, and indulgent treat anytime your dessert cravings hit.
🍫 Why You’ll Love This Recipe
- No-bake & ready in 15 minutes
- Safe to eat raw (no eggs + heat-treated flour)
- Loaded with Oreo chunks
- Perfect cookies & cream flavor
- Ideal for quick desserts or late-night cravings
🛒 Ingredients (Serves 8)
- 1 cup all-purpose flour (heat-treated)
- ⅓ cup unsalted butter (softened)
- ⅓ cup granulated sugar
- 2 tbsp milk
- 1 tsp vanilla extract
- ¼ tsp salt
- 8 Oreo cookies (roughly crushed)
🔥 How to Heat-Treat Flour (Important!)
Raw flour can contain bacteria, so don’t skip this step!
- Preheat oven to 350°F (175°C)
- Spread flour evenly on a baking sheet
- Bake for 5–10 minutes until it reaches 160°F (70°C)
- Let cool completely before using
👩🍳 Instructions
1. Crush the Oreos
Place Oreos in a sealed bag and crush into chunks (not fine crumbs).
2. Cream Butter & Sugar
In a bowl, beat butter and sugar until light and fluffy.
3. Add Wet Ingredients
Mix in milk, vanilla extract, and salt until smooth.
4. Add Flour
Stir in heat-treated flour on low speed until fully combined.
5. Fold in Oreos
Gently mix in Oreo chunks to keep them nice and chunky.
6. Serve & Enjoy
Eat immediately or chill for later!
💡 Tips for Best Texture
- Let chilled dough sit at room temp for 10–15 minutes before eating
- Microwave for 10 seconds if too firm
- Don’t over-crush Oreos—chunks = better texture
🍽️ Serving Ideas
- Enjoy straight from the bowl 🥄
- Scoop into dessert cups
- Add to ice cream
- Roll into bite-sized cookie dough balls
- Use as a topping for brownies or cakes
🧊 Storage
- Store in an airtight container in the fridge for up to 1 week
- Best enjoyed slightly softened
📌 Pinterest Description
Oreo cookie dough 🍪✨ Safe to eat raw, no-bake, and loaded with cookies & cream flavor! The ultimate sweet treat for chocolate lovers.
#OreoDessert #CookieDough #NoBakeDessert #EasyRecipes #DessertLovers #SweetTreats #CookiesAndCream #FoodInspo #HomemadeDessert #QuickDessert
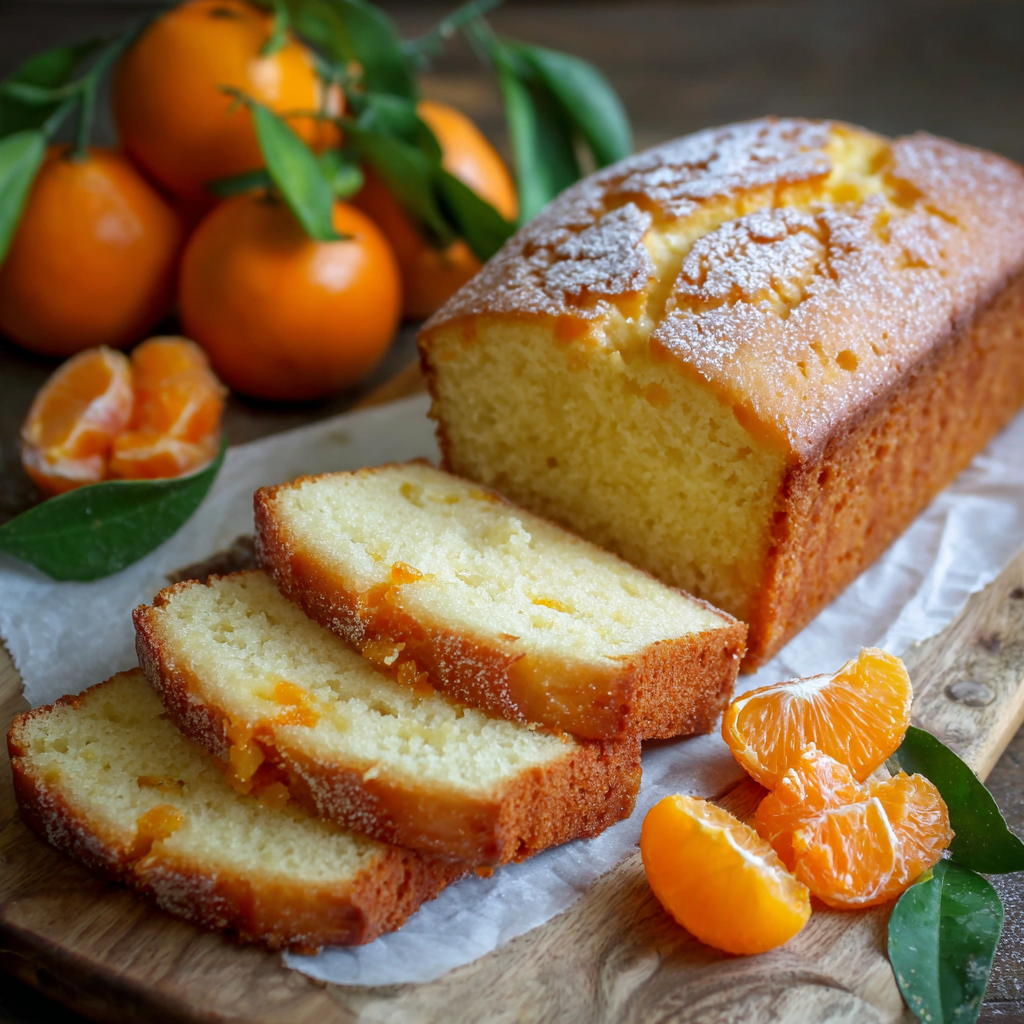
A moist, fluffy pound cake flavored and drizzled with the zest and juice from fresh Cuties Mandarin oranges! Citrus Cake-12 First NEW Advertisement It’s the season for Mandarins! And like many of us, I end up putting a bag filled with these small orange fruits in my shopping cart almost every week. It’s really a bigger part of my plan to buy healthy snacks that we can quickly grab and eat during the day. I love the bright orange color — and they’re so easy to peal and so refreshingly delicious! Citrus Cake-5 A Advertisement Even though I love how these little mandarins pack such a big burst of flavor, it’s hard to get my family to eat them all before they start going bad. It seems lately that I’m the only one regularly snacking on these cuties! When I noticed that these gems were not being pealed and eaten as fast as they needed to be, I decided to incorporate them in a recipe. Citurs Cake-14 A So, into the kitchen I went – with one thing in mind. How could I use a few juicy oranges in a yummy treat that my family would actually eat? Enter the inspiration. I recently purchased and made Trader Joes’ delicious boxed Grapefruit Pound Cake. My family devoured this, so I decided a mandarin infused pound cake was the way to go. And I was right – this Mandarin Orange Pound Cake was a hit and a must try for the season! The soft, moist, cake flavored with both the juice and zest of the mandarins along with the glaze that was also flavored with the juice and zest sprinkled on the top, literally melts in your mouth. Citrus Cake-10 A Mandarin Orange Pound Cake Servings: 10 slicesDifficulty: easyPrint By: Sheila | Sweet Baked LifeCitrus Cake-9 tumbnail Ingredients For the Cake: 1-1/2 cups all purpose flour 2 teaspoons baking powder 1/4 teaspoon salt 1/2 cup (1 stick) butter, room temperature 1 cup granulated sugar 2 large eggs 2 tablespoons mandarin orange zest 1/2 cup freshly squeezed mandarin orange juice 1/2 cup sour cream For the Drizzle: 1 cup confectioners sugar 4-6 tablespoons freshly squeezed mandarin juice 1 tablespoon mandarin orange zest for garnish Instructions: Heat your oven to 350 degrees. Prepare a standard loaf pan (8-1/2 x 4-1/2 inches) with cooking spray and set aside. Into a medium bowl whisk together the flour, baking powder and salt. In a large bowl of a stand mixer, beat the butter and sugar until fully incorporated. Then, add the eggs and beat until well blended. Next add the orange zest, orange juice and sour cream. Mix until just incorporated then slowly add the dry ingredients and mix until incorporated. Pour the batter into the prepared pan and bake for 50-60 minutes; until a toothpick inserted to the middle comes out clean. Remove from oven and let cool on a rack. When cool, remove cake from pan and prepare the drizzle. For the drizzle: Into a small bowl add the confectioners sugar and orange juice, whisk to combine. Add more juice or sugar until you get the consistency you like. Place the cake onto a serving tray and pour the drizzle on top. Sprinkle with orange zest. Slice into pieces and serve. REWRITE ARTICLE
Mandarin Orange Pound Cake (Moist, Bright & Irresistible)
This Mandarin Orange Pound Cake is soft, buttery, and bursting with fresh citrus flavor 🍊✨ Made with the zest and juice of sweet mandarins, every bite is moist, fluffy, and perfectly balanced between tangy and sweet. Finished with a glossy citrus drizzle, this cake truly melts in your mouth!
🍊 Why You’ll Love This Cake
- Super moist & tender texture
- Fresh citrus flavor from real mandarins
- Easy to make with simple ingredients
- Perfect for breakfast, dessert, or afternoon tea
- Great way to use extra mandarins before they go bad
🛒 Ingredients
For the Cake:
- 1 ½ cups all-purpose flour
- 2 tsp baking powder
- ¼ tsp salt
- ½ cup (1 stick) butter, softened
- 1 cup granulated sugar
- 2 large eggs
- 2 tbsp mandarin orange zest
- ½ cup fresh mandarin juice
- ½ cup sour cream
For the Glaze:
- 1 cup powdered sugar
- 4–6 tbsp fresh mandarin juice
- 1 tbsp mandarin zest (for garnish)
👩🍳 Instructions
1. Prep the Oven
Preheat oven to 350°F (175°C). Grease a standard loaf pan (8.5 x 4.5 inches).
2. Mix Dry Ingredients
In a bowl, whisk together flour, baking powder, and salt.
3. Cream Butter & Sugar
In a large bowl, beat butter and sugar until light and fluffy.
4. Add Wet Ingredients
Mix in eggs, then add mandarin zest, juice, and sour cream. Stir until just combined.
5. Combine
Gradually add dry ingredients and mix until smooth.
6. Bake
Pour batter into prepared pan and bake for 50–60 minutes, until a toothpick comes out clean.
7. Cool
Let cake cool completely before removing from pan.
🍯 Make the Citrus Glaze
In a small bowl, whisk powdered sugar with mandarin juice until smooth. Adjust thickness as needed.
Pour glaze over the cooled cake and sprinkle with fresh zest.
💡 Tips for Best Results
- Use fresh mandarin juice & zest for maximum flavor
- Don’t overmix the batter to keep the cake tender
- Let the cake cool fully before glazing
- Add extra zest on top for a vibrant finish
🍽️ Serving Ideas
- Serve with tea or coffee ☕
- Add whipped cream or vanilla ice cream
- Perfect for brunch or light dessert
- Slice and enjoy as a sweet snack
🧊 Storage
- Room temperature: 2–3 days (airtight)
- Fridge: up to 5 days
- Freezer: up to 2 months